27 Apr 2016

NO CREAM, JUST THREE INGREDIENTS NO COOK MANGO ICECREAM

Hello everyone

Today I have summer cooler easy peasy ice cream recipe. As summer started and everyone need some chilling cooler to beat the heat.
With hot summer the first pleasing name comes to mind is the king of fruits MANGO. I think no one can say 'no' to this yummy droolsome fruit, everyone from kids to elders love it, Even my mom is a big fan of mangoes. So thought to try my hands on mango ice cream without using cream but with easily available handy ingredients with no compromise in taste. It is so easy, no cook , no fuss recipe that can be prepared in minutes. And the end result is so tempting and yummilicious that you can't resist yourself asking for another one.  Even my fussy eater kids loved it.
Step wise recipe is given and hope you all will like this summer cooler.

NO CREAM , JUST THREE INGREDIENTS NO COOK MANGO ICE CREAM


Yield: 10-12 ice creams, depend on size of mold
Time: 10 mins ( leaving freezing time)


Ingredients 

3 big size , nice ripe mangoes, roughly chopped
1 cup milk powder
Sugar to taste ( depend on sweetness of mango), I used left over syrup of rasgulla 

Method:

Take all ingredients in a blender and churn to nice thick smooth paste.


 I added little yellow colour and mango essence to my mango paste as my mango was just pale yellow.
** This step is completely optional, if you have nice orangish or yellow mango then no need to add color. 


Now pour the prepared paste in Ice cream molds and keep in freezer overnight or atleast 6-7 hrs.


Now demold icecream by putting mold under running water. Serve and see the happiness on faces , without any guilt.


Your prepared paste should be thick like idli batter. As I used little sugar syrup in my batter so very small ice crystals were formed after two days of freezing. 
You can also use canned mango pulp, nearly 2 cup.


You can also add condensed milk instead of milk powder and sugar to enjoy more rich flavor.
Hope you will like to try this guilt free healthy ice cream recipe for your kids and family.


Your easy peasy summer cooler mango ice cream is ready to serve. Enjoy it and please pour your valuable comments and suggestions . I will always like to reply your queries regarding recipe. So please keep asking if any confusion.

Happy cooking....

26 Apr 2016

EGGLESS SWEET POTATO COCO CHOCO MARBLE CAKE

Hello everyone 

I bought sweet potatoes some time back, but no one liked it. Although I know how much healthy and nutritious it is but what to do . Then I tried to bake this cake for my kids using this sweet potato.
My sweet tooth daughter always used to ask why healthy stuffs are not yummy and what we like to eat are always comes under unhealthy category 😕😕. Actually my whole family is sweet tooth and also having great tendency to get fat too easily😭 , so to avoid extra calories in our diet we have to make a reasonable distance with sugary and fatty stuffs😰. 
But this is also like a boon too me, so that I can experiment with healthy stuffs and turn them to interesting healthy cum yummy dishes.
This cake is the best example of taste with health. I used all healthy alternatives to usual ingredients of a cake, which lead to this super yummy healthy sweet treat. Now no need to take just one bite of your sweet crush to satisfy your craving. And the second best thing is , it's best and yummy way to use your rejected sweet potatoes. You can say it a perfect combo for your cup of tea. A happy dessert to health conscious fellows.
Step wise recipe is given below, hope you will enjoy this tasty, yummy and healthy treat. sure give it a try , you will never regret.

EGGLESS SWEET POTATO COCO CHOCO MARBLE CAKE


Serves: 5-6
Time: 1: 15 hrs

Ingredients 

2 cup all purpose flour/ whole wheat flour/ chapatti flour ( I always use chapatti flour for all my baking)
1 tbsp corn flour
1 1/2 tsp baking powder
1/2 tsp baking soda
1/8 tsp salt

3/4 cup boiled and mashed , sweet potato
3/4 cup thick yogurt/ curd
1/2- 1 cup water/ milk  ( as per need)
3/4 cup sugar ( as per taste, I used less)
1/2 cup oil ( I used little less)
1 tsp vanilla essence 

1 tbsp Complan  , chocolate flavour ( completely optional)
2 tsp cocoa powder
1/3 cup desiccated coconut


Method:

First of all grease a bundt or any pan of your choice and dust it with some flour, keep it aside.

Mix well or sieve flour, baking soda, baking powder, corn flour and salt together, keep it aside for later use.


Now add mashed sweet potato, yogurt, sugar, vanilla essence and oil together and beat well till nicely mixed and fluffy. with a fork till they become a lump less puree. Never over beat your wet mixture ,beat  just enough to make light homogeneous mixture, otherwise it will sink after baking.

Add flour mixture in 2-3 batches and fold it , Add required water/milk to make it little thick but smooth batter. 


Now add desiccated coconut and again fold to mix it properly. Now divide the batter in 3:1 ratio. Now add Complan and cocoa powder in smaller part of batter and fold to mix properly. If it feels dry, add little water or milk to maintain its consistency as rest of batter.


Pour half of the white batter in greased bundt pan and tap to escape any air bubble and also to spread batter evenly. Now pour chocolate batter all over the white batter and tap again. Finally spread rest of the half white batter all over the chocolate batter and tap again.


Place the pan in a preheated oven at 190degree C and bake for 45mins to 1 hr. Mine took 1 hr exactly but keep an eye after 45 mins as different ovens take different time for baking. Keep checking by inserting a tooth pick or knife in middle of cake, if it comes out clean then your cake is ready other wise bake for some more time.

***  Time also depends on baking pans, size and shape.

Let it cool for 5 mins then invert on a wire rack.


 Let it cool completely before slicing, to get neat slices.


Your super yummy and healthy cake slices are ready to go with your cup of tea.


You can serve it with ganache, chocolate syrup, caramel or even with chilled custard . Believe me it tastes best with all these combos. Atleast try all the combos once.


Enjoy these guilt free scrumptious sweet treat any time. It's good for kids tiffin and mid meal hunger sprang.


*You can use any dry fruits also of your choice.

*You can increase or decrease the quantity of sugar as per your taste as I kept it mild.

*You can also use any shape of baking pan, but then baking time may change, so be cautious while baking and keep checking in between.


Hope you all will definitely try this guilt free yummy cake and please pour your valuable comments and suggestions here, they meant a lot.

Happy cooking....


25 Apr 2016

LOW CALORIE EGGLESS MINT AND GARLIC MAYONNAISE

Hello everyone 

Now a days, not only kids but elders too gone mad over burgers, sandwich,pizza etc loaded with high calorie , high fat mayonnaise. But by health point of view these are not good at all. So I thought why not try some low fat, low calorie version of mayonnaise to go with these traditional fast food items  to avoid some extra calories without punishing our taste buds. This can be also used on simple whole meal or brown bread as spread, if you are health conscious fellow but can't leave the love of having yummy finger licking mayonnaise. I came across this recipe accidentally, as I was trying to make some different dip for my snacks and to my surprise it came out as super smooth silky shiny mayonnaise.
Recipe is given below, hope you all will definitely love to try it.

LOW CALORIE EGGLESS MINT AND GARLIC MAYONNAISE


Serves: 5-6
Time: 10 mins

Ingredients 

1 cup cottage cheese (soft creamy paneer) 
1/2 cup fresh thick yoghurt,curd ( low fat can be used)
1 tsp corn flour
15- 20 fresh mint leaves
1/2 tsp white pepper( I used black pepper) 
2 tsp garlic powder ( or you can also use 5-6 fresh Garlic cloves)
Salt to taste

Method:

Add all the above ingredients in a mixer jar and blend till it become creamy batter like.


Then put it in a microwave safe bowl n cook for 2-3 min stirring every 30 sec to avoid lump formation and even texture till it acquire the consistency of mayonnaise. 


If u find it little thinner then don't worry it will thicken after cooling.


**
Always use soft cheese otherwise u will get grainy texture.

For different flavor u can skip mint and add 1/2 cup of chilli sauce to it to make chilli mayonnaise.
You can add different herbs like oregano, thyme, basil etc to get herbed mayonnaise.


It's so quick n easy recipe that u can make daily n enjoy different flavours without any guilt.
It can be kept in airtight covered jar for 1 week to 10 days in refrigerator .

It goes well with any snacks as dip or use in burgers, sandwich etc.


Hope you all will like this simplest and easiest recipe ever with handy ingredients. So please give it a try and pour your valuable comments and suggestions here, they meant a lot.

MUSHROOM TAWA MASALA

Hello everyone

Mushroom is one of the favorite ingredients of my little fussy eater. So today I thought to try something new instead of regular matar mushroom, kadhai mushroom or other mushroom curries I used to make.  Here is mine version of mushroom tawa masala, little tangy and spicy side dish for mushroom lovers. Though it is prepared on tawa with some special spice mix but as I didn't have tawa big enough for this recipe, so prepared in kadhai. And the special tawa masala is also fresh homemade one to enhance the flavor of dish ,many folds. It doesn't need any extra effort or ingredients but comes out so delicious that you can't resist yourself from asking for more. 
Step wise recipe is given below , hope you all will love to try this and do share your experience with me.

MUSHROOM TAWA MASALA


Serves: 4-5
Time: 30 mins

Ingredients 


250 gms button mushroom, sliced
1 big onion, cubed
2 cup colored capsicum, cubed
2 medium tomatoes, sliced
1 big carrot, cubed or round sliced
2 medium onion, finely chopped
3-4 green chilies , finely chopped 
2 tsp ginger garlic paste
1/2 cup fresh thick yogurt/ curd, beaten
1/2 tsp turmeric powder
2 tsp coriander powder
1/4 tsp garam masala powder
1 tsp kasoori methi, crushed between palms
salt to taste
Oil


For tawa masala:

1 tsp coriander seeds
1 tsp fennel seeds
1/4 tsp fenugreek seeds
1/4 tsp black pepper corns
1/4 tsp cumin seeds
5-6 cloves
3-4 green cardamom
1/2 inch cinnamon stick
1 pinch asafetida ( heeng)
2 dried red chilies ( whole), I skipped

Method:

First of all dry roast all the ingredients given below tawa masala section till aromatic. But be careful , not to burn your spices. Let it cool completely and grind to coarse powder. Keep it covered aside for later use.


Heat some oil in a wok or sufficient big tawa. Add finely chopped onion and chilies, let them fry till transparent. Add ginger garlic paste and saute for 2 mins. Now add sliced carrots and saute for 2-3 mins and cover to cook for 4-5 mins. The carrot should be cooked but still have crunch not very mushy.


 Now add turmeric powder, coriander powder and garam masala powder, saute for 2 mins and add diced onions and mushroom. Saute for 3-4 mins and cover to cook for another 3-4 minutes or till mushroom shrinks. Now add tomatoes and capsicum, followed by prepared tawa masala.


 Saute them for 3-5 minutes and again cover to cook for 3-4 minutes. 

* You can cook for more time if you like very soft texture of your veggies. I like little crunchy texture so cooked as it.

 Now add well beaten yogurt, stirring constantly to avoid its cuddling . You can add some water at this point , if you want curry in it.
 Adjust salt and let it simmer for 5 minutes. Finally add crushed kasoori methi and mix well. 


Your lip smacking side dish is ready to go with roti/ naan/ paratha or rice. 


Every mushroom lover will definitely fall in love with this aromatic delicious dish. 


You can prepare it for any party or for guests at your home. 


** Always use fresh yogurt, otherwise your over all dish will go more tangy. 


Hope you will going to love this delectable yet easy recipe . Please pour your valuable comments and suggestions here, they meant a lot.

Happy cooking....

21 Apr 2016

VANILLA CUSTARD

Hello everyone

As summer has arrived with all its pace , so we need something chilling and soothing for our tummy too. Apart from ice creams and cold drinks , some healthy cum yummy dessert also works best. So today I am sharing a very easy yet super tempting dessert anyone can prepare and satisfy everyone's tummy without more fuss. You can find this dessert in almost all parties and celebrations, as it is too easy to cook. 
Stepwise recipe is given below, do try and don't forget to share your experience with me.

VANILLA CUSTARD


Serves: 6-7
Time: 30 mins ( leaving chilling time)

Ingredients 

1 lt milk
50 gms custard powder
1/2 cup sugar ( as per taste)
Fruits , cut in bite size pieces ( Apple, banana, kiwi, grapes, pomegranate, pears etc)
Dry fruits ( as per your choice) , chopped roughly ( completely optional) 

Method:

First of all boil the milk and add sugar to it.


 In the meanwhile dissolve custard powder in 1/4 cup of warm milk to make a thin smooth paste. 


Now add the custard paste to boiling milk and stir constantly to avoid formation of any lump. Let it boil again, stirring in between. Let it simmer for 10-12 mins or till you see it got nicely thickened and colour also darken to dark cream from light. 


**If you feel your custard is not looking as thick as in pics then don't panic as it will further thickens on chilling.

 Now switch off the flame and let it cool completely but stir it occasionally during cooling to avoid formation of dry skin over it. Now add chopped fruits and nuts. Mix well and serve. But for best taste, chill it before serving.


I used to prepare it and let it chill in fridge. When need to serve just add freshly chopped fruits and nuts of everyone's choice and serve. As my kids are picky eater that's why I use this trick of serving according to individual choice. You can also use it to have different taste in every bowl.


This measurement ratio is perfect and never fails so follow blindly and relish on your creamy delight every time.


Hope you will like this super easy recipe and please pour your valuable comments and suggestions here, they meant a lot.

Happy cooking....


18 Apr 2016

VEGGIE LOADED BHAAJI FOR PAV

Hello everyone

Pav bhaaji is one of the most popular street food in India. Generally everyone loves to relish on these yummy delicious snack. But due to hygiene purpose sometimes we try to avoid having these outside. So why not prepare these at home in fully hygienic and healthy way. You can find readymade pav or bake it at home with my easy pav recipe. And for bhaaji, it's in your hand that how much healthy you can make it. Most of the kids don't like capsicums, beetroot, peas, corn , spinach etc so here is a golden chance to feed them all these veggies in a yummier way. I used to prepare my bhaaji with lots of veggies and minimum butter and oil , which makes it much more healthier for everyone. Today I am sharing my recipe of bhaaji, hope you all will definitely love to try this.

VEGGIE LOADED BHAAJI FOR PAV


Serves: 5-6
Time: 30 mins


Ingredients 

4 cup mixed veggies, roughly chopped ( beans, carrot, potato, peas, corn, beetroot etc)
1/2 cup capsicum, finely chopped
1 cup spinach finely chopped
2-3 big onion, finely chopped
4-5 green chilies, finely chopped
2 tsp ginger garlic paste
2 big tomatoes, finely chopped
1/2 tsp turmeric powder
1 tbsp pav bhaji masala
2 tsp coriander powder
1/2 tsp garam masala
1/2 tsp chaat masala 
1/4 cup coriander leaves, finely chopped
Salt to taste
Oil

Method:

First of all pressure cook mixed veggies till completely cooked and tender. Now mash it with a masher or use hand blender. But don't make puree of veggies , we want little chunky texture for perfect bhaaji, like restaurant ones. Keep aside for later use.
Heat some oil in a wok and add chopped onions and chilies. Let them cook till transparent then add ginger garlic paste. Saute for a minute and then add all dry spice powder except chaat masala. Saute for a minute and add capsicum and spinach. Let them cook till nice soft, then add chopped tomatoes. Let the tomatoes cook till nicely cooked and mushy. Now add mashed veggies and adjust salt.

 If needed add some water as we don't want too dry bhaaji. Bhaaji also dries up on cooling so add water accordingly. Let it cook for 5-8 mins ,then add chaat masala and green coriander leaves. Mix well and your yummy healthy bhaaji is ready to go with pav. 


Though it is full of rejected veggies from kids, even then they will ask for it again and again. You can give it in their tiffin, breakfast or any time , even in lunch or dinner too. As it is a complete meal for everyone and delicious too, without any extra butter or oil. 
If you like it more buttery then just add it as per your taste. 


You an use any veggies of your choice and as per availability. I used only one potato but if you are fan of it , can increase as per your choice. 
For perfect reddish colour of bhaaji without adding red chilies, must add beetroot. It will increase its nutrition as well as beauty.


Hope you will love this recipe and please don't forget to drop down your experience here with me. Your comments and suggestions meant a lot.


14 Apr 2016

THREE BREADS FROM SAME PAV DOUGH ( NUTELLA FLOWER BREAD, ZATAAR BREAD, BUNNY BUNS)

Hello everyone

After baking perfect pav for my pav bhaji, I thought why not to give it some artistic twist and bake some more flavours and designs of bread from this perfect dough. I saw some patterned bread pictures few days back, on Internet . Keeping that in my mind , I tried to make these three types of breads, which are loved by everyone in both taste and look. So here is the technique and tips with step wise pics for baking these cuties. Hope you all will definitely give it a try and come up with your feedback too.

THREE TYPES OF BREADS FROM SAME PAV DOUGH


Serves: 3-4 ( each bread)
Time: 1 hr ( leaving proofing and resting time)

Ingredients

Pav dough 

Milk to brush


NUTELLA FLOWER BREAD:


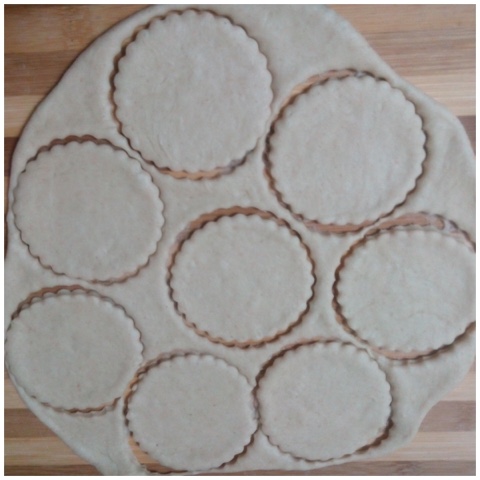
First of all cut orange size dough from well risen and again well kneaded dough. Roll a little thick chapatti from it and cut rounds from it using cookie cutter or any sharp edge glass or bowl. 


Now take one round and spread some Nutella on it as shown in pic. Now half fold it and again fold to quarter as shown in pic. Now seal its edges from one end only , as in pic .


 Now place it on a round baking dish lined with parchment paper or greased well. Similarly make all the petal shapes with Nutella and arrange as shown in pic. 


Now cover it and place at some warm place for 30-40 mins. Till then it will rise again and fill the gaps between different petals. Now brush it with some milk and bake at 200 degree C in a preheated oven for 15 mins. 


If it does not get nice golden in colour in 15 minutes then increase the oven temperature to 230 degree C and bake it further for 3-5 mins or till it get nice golden in colour. Take it out and let it cool on a wire rack.


 Your super delicious as well as eye candy is ready to serve. 


You can prepare this for any b'day party or in evening snacks or for kids tiffin too, they will love to relish on these beautiful chocolate filled breads.


ZATAAR BREAD:


Divide the remaining dough in two equal parts. Now take one dough and roll it to a rectangular little thick chapatti of your baking tray length . Spread Zataar mix on it evenly as shown in pic. Now roll it to a tight log shape. 


Now place it with sealed side down , in the baking tray lined with parchment paper or greased well. Cut the dough in 1/2 -1 cm thin slices as shown in pic. Now arrange the alternate slices as shown in pic. 


Now cover it and let it rest for 30-40 mins at a warm place. Now brush it with milk and bake at 200degree C for 15 mins. 


To make it more golden increase the temperature to 230degreeC and bake further for 2-3 mins or till get desired colour. Now let it out and cool on a wire rack.


 Your savory yummy bread is ready to be served with a cup of tea or coffee. 


Kids will also enjoy it with some sauce . You can prepare it for your kitty party or for tiffin snacks too.


BUNNY CUM PIGGY BUNS:


Divide the rest of dough in small lemon size pieces and give them oval shape using your palm. Now place then as some distance , on baking tray lined with parchment paper or greased well. 

**Always keep some distance between each buns as they will expand twice , otherwise they will stick to each other will rising or baking and ruin their shape. As some of mine got stuck to each other.

Now cover it and let it rest for 20 mins. Now make ears of it using kitchen scissors and eyes by skewer or tooth pic as shown in pic. Now again let it rest for 5 mins. Then brush it with milk and bake it at 200 degreeC for 15 mins.


 To get more golden colour again increase temperature to 230 degreeC and bake for 2-3 mins. Now let it cool on a wire rack and your cutie bunny or piggy , whatever comes out😃😃 is ready to be served to your kids.


 You can also make these buns, stuffed with Nutella, potato filling, paneer filling or any filling of your choice. I made then plain as it was my first trial but will soon share its stuffed version too. Till then serve it with bhaji, Nutella, sauce or as it is. My younger one loves plain buns more. 


**** Never divide bread dough by stretching,other wise the gluten formed during kneading will damage, just use knife to cut dough in pieces.


So bake these cuties and please your kids and family with your creativity. I tried to explain all the tips and tricks but if any thing left then please let me know by dropping down your queries and suggestions in comment box below. Your comments and suggestions meant a lot.

Happy cooking....