Today I am here with a very delicious and easy side dish , speciality of purvanchal area, nimona. Though it is prepared in winter season, when fresh green peas pods are easily available in market. But here we don't get those very easily, even in winter season too. So once I tried to make nimona with frozen green peas and viola it was hit. It turned out so delicious and tempting that from that day , I used to make it whenever have craving, irrespective of season. It is prepared in many ways in many areas of northern India, but my favorite is my mom's way, less spices and more greens. Though I used to make that spicy version too but will share its recipe later. For now try this super yum one, it's my favorite and after trying this you will never have craving for those spice laden curries.
Step wise recipe is given below, hope you will definitely give it a try . I bet you will never regret.
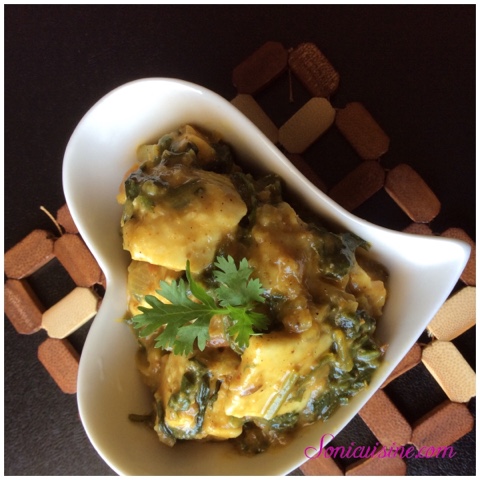
NIMONA ( GREEN PEAS PASTE CURRY)

Serves: 4-5
Time : 30 mins
Ingredients
For making paste:
1 1/2 cup green peas ( frozen or fresh, sweet ones)
1/2 cup green coriander leaves, roughly chopped
3-4 green chilies ( according to your taste preference)
2 tsp ginger garlic paste
1 tsp cumin seeds
For tempering:
1 medium onion, finely chopped
1/2 tsp cumin seeds
1/4 tsp asafetida ( heeng)
1/4 tsp turmeric powder
1/2 tsp garam masala powder
1/2+ tsp chaat masala powder
Salt to taste
Oil
Method:
First of all make little coarse paste of all ingredients given under making paste section, using little water.
* Paste should neither be too coarse not very smooth. But you can also make as per your preference.

Heat oil in a wok, add asafetida and cumin seeds. Let them crackle, add chopped onions. Fry till light golden.
Now add prepared paste followed by turmeric powder and garam masala powder.
As I use less oil so leaving oil after being nicely fried, is not visible here. Fry it till it starts making a big lump and not sticking to pan any more. It will take good 10-12 mins to get fried well. It's must for best flavours.

Now add water , little at a time stirring constantly to avoid any lump formation. Add water according to your preference of consistency of curry.
Add salt and chat masala powder. Let it boil and then simmer for 5-7 mins.

Your delicious curry is ready to be served with roti or rice. It tastes best with non aged rice with mild sweetness.

*** And don't forget to add a dollop of pure ghee in each serving, it increases its flavours manifold.
* I don't add potatoes in my nimona but if you prefer, fry cubed potatoes till done and add to the curry while simmering.

* You can also add paneer cubes.
* Always use soft and sweet peas for best out come.

* You can use fresh garlic pods and ginger for much better taste.
* You can also use more spices if you prefer but even this will give you perfect taste, I can bet.

I prefer this curry over spicy one, as it is perfect blend of sweetness of peas , aroma of green coriander and hotness of chilies. Do try and you will never regret.
Please pour your valuable comments and suggestions here, they meant a lot.
Happy cooking....